MISSION, KS--(Marketwire - December 27, 2010) - (Family Features) The kids at the beach... the grandkids at Christmas... the sunset shots of your last vacation... you've got plenty of great photos that you'd love to share. Why not show them off in some creative displays that you made yourself?
Crafters are always coming up with unique and beautiful ways to showcase family photos. These two crafts use an unexpected, but very handy, tool -- a laminator. Laminators, available in stores such as Costco and Hobby Lobby, are no longer relegated to schools and offices. More small laminator models, such as those offered by Purple Cows, are small enough to use at home, yet versatile enough to be used in a variety of projects. Not only can the Purple Cows Hot & Cold Laminator be used to protect documents, photos, artwork, notes and more, it can also be a wonderful creative tool in projects like these unique photo books.
To get more fun and creative project ideas and how-tos, as well as videos and tutorials, visit www.purplecows.net.
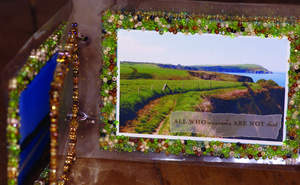
Clearly Unique Travel Album
A Purple Cows Designer Project
by Robin Gibson
Tools:
Purple Cows Hot and Cold Laminator #3025
Purple Cows Freestyle Mouse Kit #6045
Hole punch
Supplies:
Purple Cows Hot Pockets 5 x 7 #4021
Vellum quotes
1/2 inch double-sided tape
Small beads, such as Beader's Paradise Emerald Mix & Topaz Luster Mix
Wide brown ribbon
2 book rings
1. Place 2 photos back-to-back (this will make 1 page). Choose a vellum quote and trim it using your favorite decorative-edged click blade with the Freestyle Mouse Kit.
2. Place the quote directly onto your photo in a place where it can be clearly seen. Run the hot pocket through the laminator. Instantly you have a photo page.
3. On the surface of your photo page, place a strip of double-sided tape along each edge of your now-sealed photo. Repeat this step on the backside of the photo page as well, before you embellish.
4. Now you are ready to place the beads around the photo edge. Do this step inside a shoe-box lid, for easy catching and clean up of the loose beads. Pour the beads over the photo and press them into the tape. Shake off loose beads, and save for another page.
5. Repeat step 4 on the backside of the page, so both pictures now have beaded frames. Repeat steps 1 to 5 for each page in your book.
6. Line up your pages and punch holes in the left-hand side, using a crop-a-dile or other type of hole punch tool. Make ring covers by folding a wide piece of brown (scrap) ribbon in half, and sewing a seam down the edge. Run the rings through until you have enough "scrunch" to your liking. Cut the ribbon end and secure the rings through the pages of your book.
Mini Brag Book
A Purple Cows Designer Project
by Robin Gibson
Tools:
Purple Cows Hot Laminator #3020
Purple Cows #1040 2-in-1 Combo Trimmer
Short Wave Designer Click Blade #2803
Hole punch
Rub-on applicator tool
Corner rounder
Supplies:
Rub-ons
Patterned paper
Letter stickers
Cardstock
Fluid chalk ink, various colors
Glue Glider Pro -- Permatac Cartridge
Black journaling pen
1. Print or crop your photos to 2 x 3-inch size. If desired, round photo corners using the corner rounder.
2. Select your background papers/cardstock and, using your combo trimmer, cut a background for each photo. Vary your cut edges by using the guillotine blade for a straight cut, or the rotary cutter and your Short Wave Designer Blade for a decorative edge cut.
3. Decide if your photos will be centered or off-set, and adhere to the background papers using your Glue Glider Pro. For applying larger rub-on letters alongside the photo, you may need the photo off-center, as desired.
4. Apply rub-on letters to the top or along the side of each photo/background as desired, using the rub-on applicator tool.
5. Write any journaling in the "banner" area of appropriate rub-on, and apply to the bottom of the desired photograph.
6. For your front page, choose a blank journal block and trim around the edges with scissors. Ink with chalk ink.
7. Adhere to one of your pre-cut background papers, as desired.
8. Apply your brag book title to the journal block, using rub-ons.
9. Turn on laminator, so it can be warming up while you ink the edges of your mini-pages using the chalk inks as desired.
10. Adhere 2 mini-pages back to back, so when laminated, they will be one page of your brag book.
11. Set your now-completed mini-pages into the 2 x 3 Hot Pockets, and run them through your laminator so they are permanently sealed.
12. To hang your Mini Brag Book on a lanyard, line up pages and use a hole punch to make holes where it will attach to the lanyard.
Laminator Tips
- Figure out what kinds of projects you want to work on before buying a laminator. If you plan to protect heat-sensitive paper printed with ink or photos that may not stand up to heat, a cold laminator will work best. It uses an adhesive activated by pressure instead of heat. A hot laminator melts an adhesive, which can be either a plastic sheet or a laminator pouch, depending on the type of laminator.
- When laminating items that do not fill the pocket, especially the leading edge, place the pocket on top of a plain sheet of paper or lightweight cardstock (the same size or larger than the pocket) when you send it through the laminator. This will act as a carrier sheet and keep the hot pocket from curling or getting caught in the unit.